
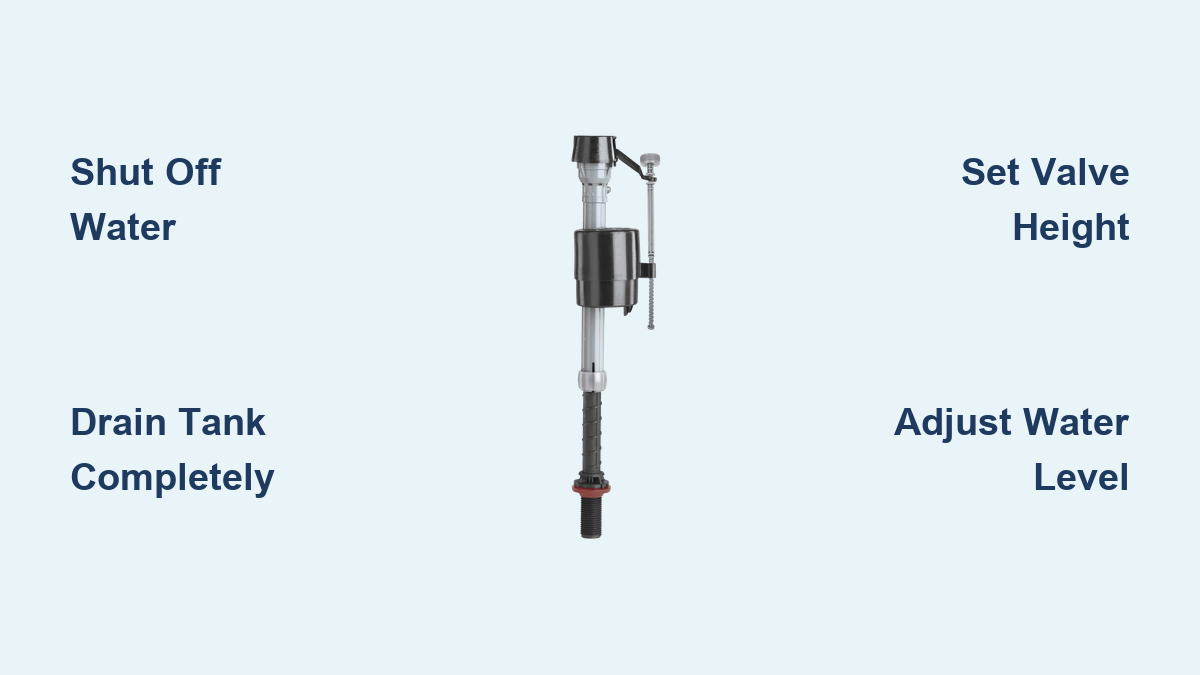
A running or leaking toilet wastes hundreds of gallons of water each month and quietly inflates your utility bill. In most homes, the blame falls on a worn-out toilet fill valve, the part that refills the tank after every flush. When it fails, you may notice slow refills, dripping sounds, or water that never reaches the right level. The good news is that toilet valve installation ranks among the simplest plumbing repairs a homeowner can tackle without prior experience.
Replacing the part yourself costs roughly $8 to $10 and takes just 10 to 30 minutes, compared to paying a plumber $50 to $100 for the same job. This guide covers every step from shutting off the water supply to calibrating the final fill level. You will learn how to stop leaks, restore strong flushing performance, and prevent future water damage, all with basic household tools.
Shut Off the Water Supply
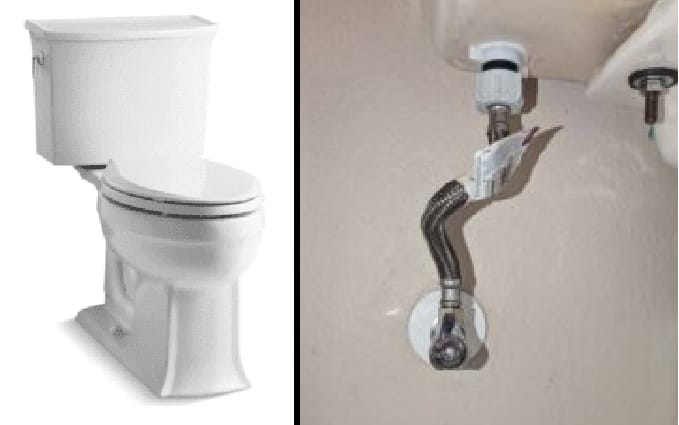
Cutting off the water flow is the first safety step before any toilet valve installation.
Locate the Shutoff Valve
Look for a small valve on the wall or floor behind the toilet base. Turn the handle clockwise until it stops. This shuts off water to the toilet only. If the handle feels stiff or the valve leaks when turned, wrap a rag around it for better grip. Forcing a stuck valve can break it and force you to shut off the main supply to your home.
Confirm the Water Is Off
Flush the toilet to empty most of the tank. Watch closely as the tank refills or stays empty. If water continues flowing into the tank, the shutoff is not fully closed. Turn the handle a bit more and flush again. Only proceed when the tank stays dry after flushing.
Drain and Dry the Tank
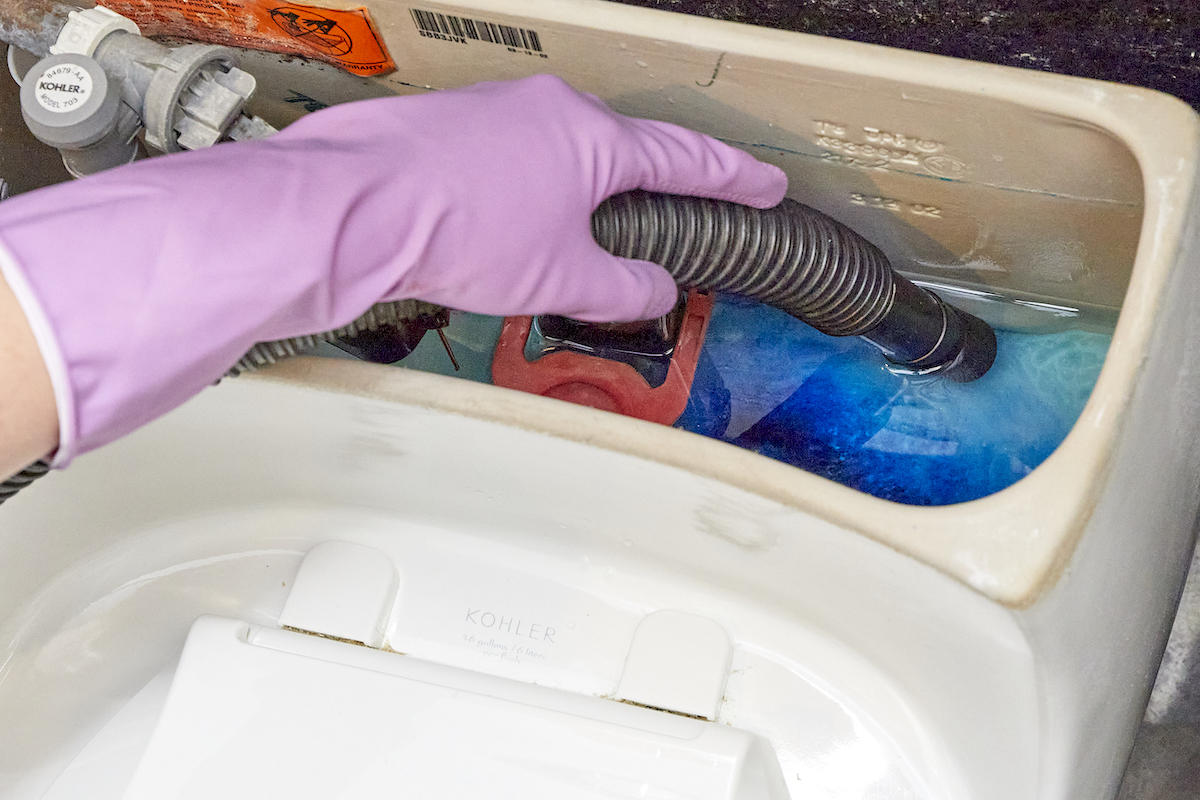
A completely dry tank makes removal and installation cleaner and safer.
Remove Remaining Water
A shop vac with the filter removed offers the fastest way to clear the tank. Without a shop vac, scoop water out with a cup and soak up the rest using towels or a large sponge. Pay extra attention to water pooled around the base of the old valve, since this water will spill when the valve is disconnected.
Wipe Down the Surface
Use paper towels to dry the tank bottom thoroughly. Inspect the hole where the valve passes through the porcelain. Scrape away any old gasket bits, mineral crust, or debris. A clean surface is critical for the new gasket to form a watertight seal.
Remove the Old Fill Valve
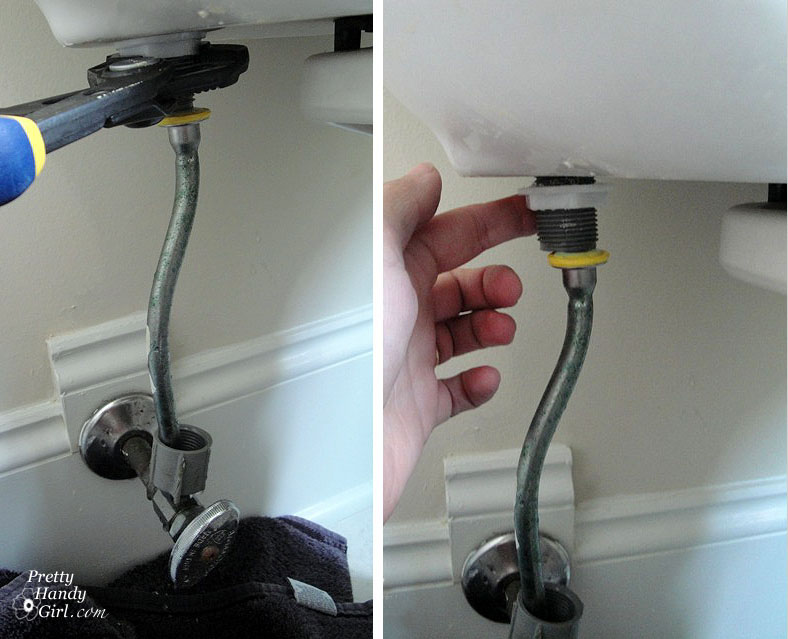
Careful removal protects the tank and supply line from damage.
Disconnect the Supply Line
Crawl under the tank and locate the nut connecting the water supply line to the fill valve. Loosen this nut with an adjustable wrench while holding the valve steady with your other hand. Expect a small drip when the connection breaks. Keep paper towels within reach.
Loosen the Mounting Nut
Beneath the tank, find the plastic retaining nut that locks the valve in place. If the nut feels stuck, grip it with channel lock pliers and turn counterclockwise. Once loose, finish unscrewing by hand. Avoid using excessive force, as ceramic tanks crack easily under pressure.
Lift Out the Old Valve
Pull the entire assembly straight up and out of the tank opening. Trapped water in the supply line may drain as you lift. Set the old valve aside for disposal or recycling once the tank is clear.
Prepare the New Fill Valve
Proper preparation ensures the new part fits correctly and seals properly.
Check Compatibility
Confirm the new valve matches your toilet model. Dual-flush and low-flow toilets often require specific valve designs. Some manufacturers print a number on the top cap that corresponds to certain tank styles. Universal kits typically include multiple adapters for broader fit.
Assemble the Components
Slide the rubber gasket onto the valve shank. Connect the refill tube to the side outlet. If the kit includes a flow restrictor (a small washer with a pinhole), install it inside the supply inlet to limit water usage during refills.
Set the Correct Valve Height
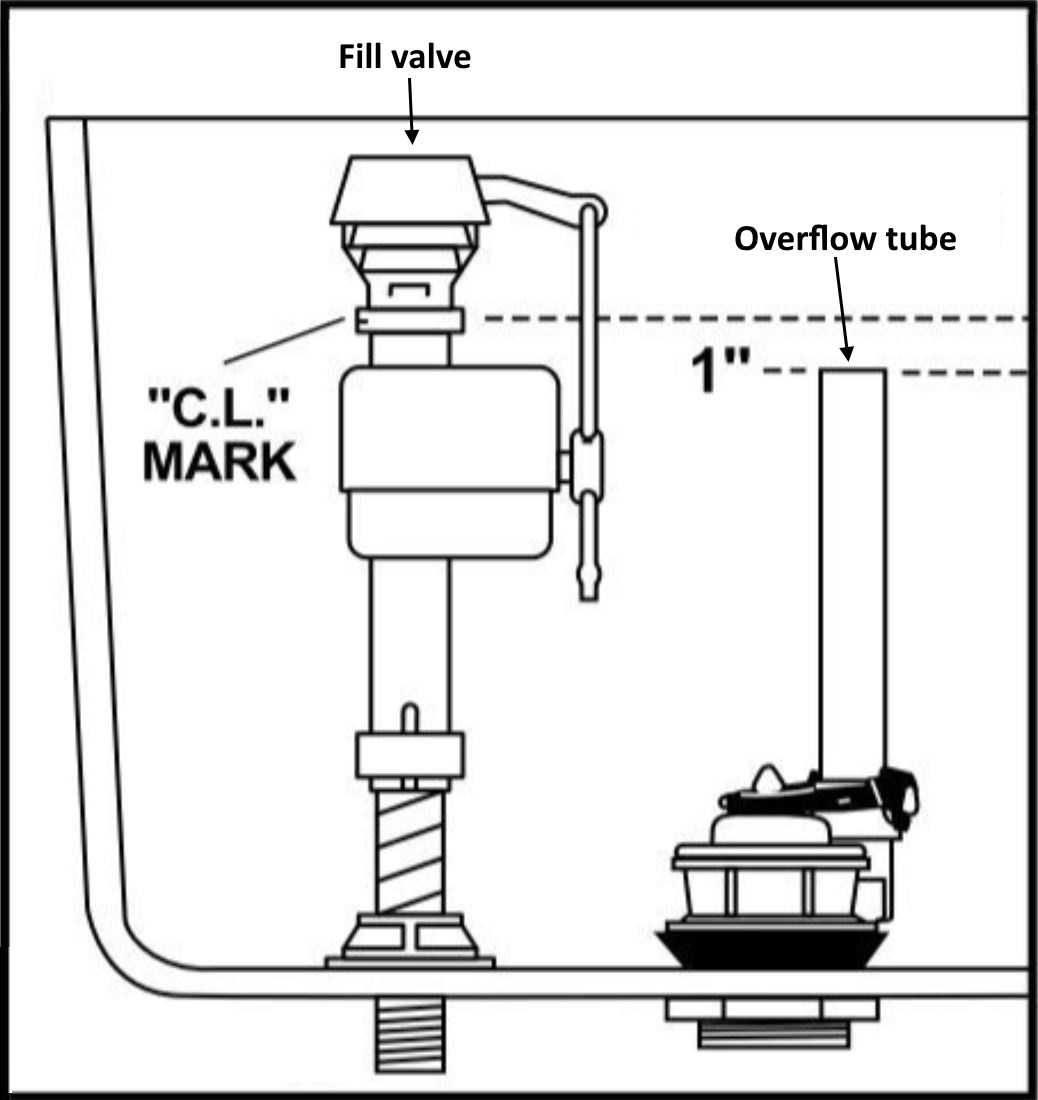
Correct height prevents siphoning and ensures the valve shuts off reliably.
Measure Clearance Above the Overflow
The top of the new valve must sit at least 1 inch above the top of the overflow tube. Use the sliding collar or adjustable sleeve to set the right length. Measure from the tank floor to the overflow rim, then adjust the valve to match.
Test the Fit Before Securing
Insert the valve into the tank hole without tightening anything. Confirm the valve sits flush and the float arm clears the flush lever. Rotate the valve slightly if needed for the best clearance.
Secure the New Valve in Place
Tighten the valve just enough to seal, without cracking the tank.
Install the Gasket and Nut
Slide the rubber gasket onto the threaded shank from underneath the tank. Thread the retaining nut onto the base and turn it by hand until snug.
Avoid Over-Tightening
Never use tools for the final tightening step. Plastic nuts and ceramic tanks crack under excessive force. A snug hand-tight seal is all you need. For added protection, smear a thin layer of plumber’s grease on the gasket before installation.
Reconnect the Water Supply
Restore water flow carefully to avoid leaks and pressure damage.
Reattach the Supply Line
Thread the supply line nut onto the valve inlet by hand first. Finish tightening gently with an adjustable wrench. Overtightening this joint often causes leaks rather than preventing them.
Address Slow Refill Issues
If the tank takes longer than 5 minutes to refill, the included flow restrictor may be too restrictive for your home’s water pressure. Remove the restrictor washer to boost flow. Swap in a larger-diameter washer if you still want some conservation.
Route the Refill Tube Properly
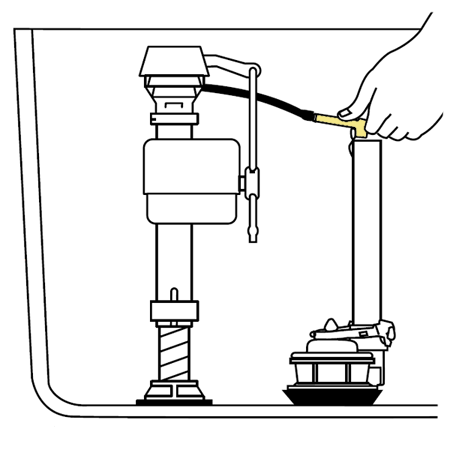
Correct routing keeps the bowl refilling after each flush.
Attach and Clip the Tube
Connect one end of the refill tube to the valve’s side outlet. Clip the other end to the overflow tube using the included plastic adapter. Position the open end above the water line inside the overflow pipe.
Prevent Siphoning
Never let the tube dangle below the water line inside the tank. A submerged end can siphon water continuously, creating a running toilet. Keep the tube arched slightly to block backflow.
Turn On the Water and Test
Pressurize the system and watch for early warning signs.
Open the Shutoff Valve Slowly
Turn the valve counterclockwise in gradual increments. Sudden pressure can dislodge connections or damage the new valve. Watch closely for leaks at the base and supply line as pressure builds.
Monitor the Fill Cycle
Let the tank fill completely. The valve should shut off automatically when water reaches the correct level. Listen for hissing or dripping after shutoff, since these sounds signal a problem that needs attention.
Calibrate the Water Level
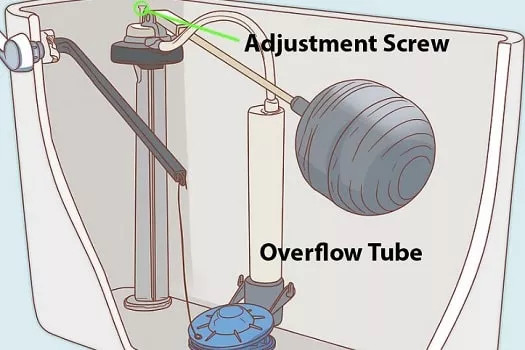
Fine-tuning the fill height ensures strong, efficient flushes.
Target the Correct Fill Height
Water should stop 1 inch below the top of the overflow tube. Many tanks have a molded fill line on the interior porcelain. Align your water level with that mark whenever possible.
Adjust the Float Mechanism
Use the adjustment screw or slider on top of the valve to change the water level:
– Turn clockwise to raise the water level
– Turn counterclockwise to lower it
Wait for a complete refill cycle after each adjustment to confirm the new setting works.
Check for Leaks and Performance Issues
A final inspection confirms long-term reliability.
Inspect the Base and Joints
Look under the tank for drips around the valve base or supply connection. If you spot moisture, tighten the retaining nut or supply line slightly. Stop immediately if resistance builds, since overtightening causes cracks.
Flush and Re-Test
Flush the toilet two or three times. Confirm each of the following:
– The tank refills fully in under 5 minutes
– The valve shuts off completely
– The bowl refills through the refill tube
– No running or gurgling sounds occur after filling
Troubleshoot Common Installation Problems
Quick fixes for issues that may appear after toilet valve installation.
Tank Refills Too Slowly
Cause: Flow restrictor too tight for your home’s water pressure.
Fix: Remove or replace the restrictor washer with a higher-flow version.
Toilet Runs Continuously
Cause: Water level set too high, spilling into the overflow tube.
Fix: Lower the float setting until water stops 1 inch below the overflow rim.
Leaking at the Valve Base
Cause: Dirty tank surface, damaged gasket, or uneven tightening.
Fix: Drain the tank, remove the valve, clean the hole, regrease the gasket, and reinstall with even hand pressure.
Refill Tube Not Working
Cause: Kinked, twisted, or submerged refill tube.
Fix: Reroute the tube with a smooth curve and confirm the open end sits above the water line.
Maintain Valve Performance Over Time
Simple upkeep prevents future failures and extends valve life.
Clean the Valve Every 6 Months
Mineral buildup clogs valve openings over time. Shut off the water, remove the cap, and rinse internal parts with white vinegar if flow seems restricted.
Replace the Valve Every 5 to 7 Years
Even without visible symptoms, replace the fill valve every 5 to 7 years. Preventive replacement avoids sudden failures and unexpected leaks.
Upgrade for Low-Flow Toilets
If your toilet has weak flushes, confirm the valve is rated for low-flush or dual-flush systems. Standard valves may not deliver enough water volume for these designs.
Frequently Asked Questions About Toilet Valve Installation
How long does toilet valve installation take for a beginner?
Most beginners finish the job in 20 to 30 minutes. Experienced homeowners often complete the work in 10 to 15 minutes. The exact time depends on how stuck the old mounting nut is and whether the tank needs extra cleaning.
Do I need to turn off the main water supply to replace a fill valve?
No, the local shutoff valve behind the toilet is usually enough. Turn it clockwise until tight, then flush to confirm the tank stays empty. Only use the main supply if the local valve is missing or broken.
What happens if I over-tighten the retaining nut?
Over-tightening can crack the plastic nut, damage the rubber gasket, or split the ceramic tank. Hand-tight pressure is sufficient for a watertight seal. If leaks appear, tightening slightly with pliers is acceptable, but stop as soon as the drip stops.
Why does my toilet still run after replacing the fill valve?
A running toilet after replacement usually means the water level is set too high. Water flows over the top of the overflow tube and the valve keeps trying to refill. Lower the float setting until the water stops 1 inch below the overflow rim.
Can I use a universal fill valve on any toilet?
Universal valves fit most standard toilets. Dual-flush and low-flow models may require specific valves for proper activation and water volume. Check the packaging for compatibility numbers or model listings before purchasing.
How do I know if my fill valve needs replacing?
Common warning signs include slow refills, constant running, hissing sounds after the tank fills, water levels that never stabilize, or visible leaks around the valve base. Any of these symptoms typically point to a failing fill valve.
Key Takeaways for a Successful Toilet Valve Installation
Replacing a toilet fill valve is one of the highest-value DIY plumbing repairs available. For under $10 and less than 30 minutes of work, you can stop water waste, eliminate running sounds, and restore strong flush performance. The most important details to remember are setting the valve height at least 1 inch above the overflow tube, hand-tightening the retaining nut to avoid cracks, and calibrating the water level to stop 1 inch below the overflow rim.
Start by gathering your tools, shutting off the water, and draining the tank completely. Work through each step methodically, and test the system with several flushes before declaring the job done. If you own a dual-flush toilet or encounter persistent leaks after installation, verify compatibility or call a licensed plumber for support.