
A toilet that keeps running, hisses nonstop, or fills slowly usually points to one culprit: a worn-out fill valve, commonly called a toilet pump. This vertical tube inside your tank controls water flow after each flush, and when it fails, you could waste hundreds of gallons every week. The good news is that learning how to replace toilet pump components is a beginner-friendly repair that takes about 15 minutes with basic tools.
This guide walks you through diagnosing the problem, choosing the right replacement, and installing the new valve correctly. You’ll also learn how to troubleshoot common issues and keep your toilet running quietly for years.
Spot the Warning Signs of a Failing Toilet Pump

Listen for Hissing or Trickling Sounds
A constant hissing noise after flushing is the most obvious red flag. It means water is slowly leaking past the valve instead of shutting off completely. Check the tank water level. If it sits at or above the overflow tube, the valve is staying open and draining water unnecessarily.
Watch for Water Pooling Around the Tank Top
Moisture around the top of the fill valve or near the overflow tube signals a poor seal. This overflow wastes water and can lead to mold growth or floor damage if ignored. Address it quickly to avoid costly repairs down the line.
Test the Flush and Refill Cycle
Flush your toilet and time the refill. A healthy fill valve should fill the tank in 60 to 90 seconds, shut off completely, and stay silent once full. If the tank overfills, underfills, or runs continuously, the valve likely needs replacement.
Identify Your Toilet Pump Type Before Buying

Ball-Float vs. Cup-Float Designs
Older toilets use a ball-float system with a long metal arm and floating ball. As water rises, the ball lifts and gradually closes the valve. These systems are harder to find today since most manufacturers have discontinued them.
Modern toilets use a cup-float design, where a plastic sleeve slides up and down the valve shaft. These are quieter, more precise, and easier to adjust. Most universal replacement valves on the market use this one-piece, integrated style.
Confirm Compatibility with Your Tank
Universal fill valves fit most standard toilets, but always verify clearance before purchasing. Make sure the new valve won’t interfere with the flush lever or flapper chain. For vintage or specialty models like Toto or Kohler dual-flush systems, check compatibility online or bring the old valve to the store for comparison.
Gather Your Tools and Replacement Parts
Choose the Right Replacement Kit
Pick a universal fill valve kit from a trusted brand like Fluidmaster or Korky. A combo kit that includes both the fill valve and flapper is ideal, since flappers wear out at the same rate. Replacing both at once prevents future leaks and saves a return trip to the hardware store.
Collect Basic Tools
You only need a few simple items:
• A bucket or bowl to catch residual water
• Adjustable pliers for stubborn nuts
• A towel for drying spills
No plumber’s tape, drain snakes, or specialty wrenches are required. Most connections are designed to hand-tighten.
Shut Off the Water and Drain the Tank
Turn Off the Supply Valve
Locate the shut-off valve behind or beside the toilet base. Turn it clockwise until it stops. If the handle feels stiff, wrap a rag around it and use pliers gently. Forcing it can break the valve stem.
Flush to Empty the Tank
Flush the toilet and hold the handle down to drain as much water as possible. This lowers the water level below the fill valve and minimizes spills during removal. Use a sponge to soak up any remaining water in the tank bottom.
Place a Bowl Under the Supply Line
Position a bowl under the supply line connection before disconnecting. A small amount of water will drip out when you loosen the nut, and the bowl keeps your floor dry.
Remove the Old Toilet Pump
Disconnect the Refill Tube
Find the small flexible refill hose running from the fill valve to the overflow tube. Unclip it from the overflow tube. It usually snaps out of a plastic clip or hook with minimal effort.
Detach the Water Supply Line
Under the tank, locate where the supply hose meets the bottom of the fill valve. Turn the compression nut counterclockwise by hand. If it’s stuck, use pliers gently to avoid cracking the plastic fitting.
Unscrew the Mounting Nut
From beneath the tank, find the large retaining nut holding the fill valve in place. Unscrew it by hand or with pliers. Once loose, lift the old valve straight up and out of the tank.
Inspect the Tank Opening
Check the tank hole and water inlet for mineral buildup or cracks. Wipe the area clean with a damp cloth. If you spot cracks in the porcelain, stop the installation. A damaged tank needs replacement, not a new valve.
Install the New Toilet Pump
Adjust the Valve Height First
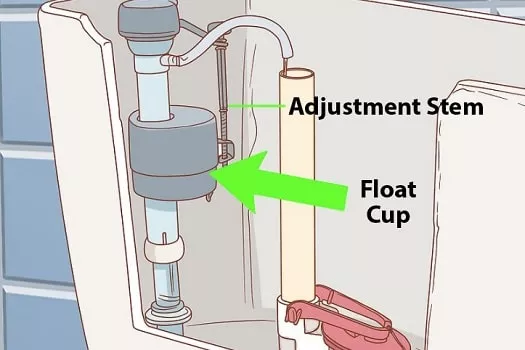
Every tank has a unique water line. Before inserting the new valve, set the height so the float shuts off water about one inch below the overflow tube top. Most modern valves use a twist or slide mechanism. Follow the packaging instructions to lock the correct height.
Insert the Valve and Secure the Base
Slide the rubber washer onto the valve’s threaded shank. Insert the valve through the tank hole from above. From underneath, screw on the retaining nut and hand-tighten it firmly. Use pliers for a final quarter-turn, but don’t over-tighten. Excessive force can crack the porcelain or strip the plastic threads.
Reconnect the Water Supply
Reattach the supply line to the bottom of the new valve. Hand-tighten the nut, then give it a snug final turn with pliers. Make sure the connection sits straight to prevent leaks.
Reconnect the Refill Tube and Test the System
Clip the Refill Tube in Place
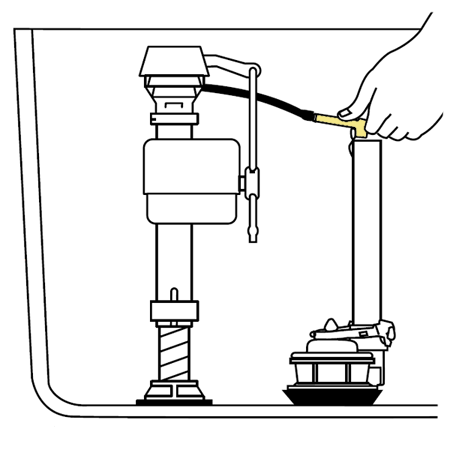
Reattach the refill tube to the overflow tube. Position it so water flows directly into the tube, not onto the tank floor. A misplaced tube can cause siphoning and continuous running.
Turn the Water Supply Back On
Slowly open the shut-off valve clockwise. Watch the tank fill and check for leaks under the tank and at the supply connection.
Verify Proper Operation
Once the tank fills, confirm these key points:
• The valve shuts off completely with no dripping
• No hissing or bubbling sounds occur
• Water level sits one inch below the overflow tube
• The refill tube stays securely clipped
If water spills into the overflow tube, lower the float height and test again.
Troubleshoot Common Installation Problems
:max_bytes(150000):strip_icc()/adjusting-types-of-toilet-ballcocks-1824861_final2-c73384b92f5240ee8a336ef54c03fe6a.jpg)
Valve Won’t Shut Off
An overfilling tank means the float is set too high. Adjust it downward following the manufacturer’s markings. For cup-float models, pinch the adjustment clip and slide the float lower on the shaft.
Slow or Weak Fill
A sluggish refill often points to a partially closed supply valve or debris in the line. Shut off the water, disconnect the supply hose, and flush the line into a bowl to clear sediment. Reconnect and test again.
Leak at the Base
If water drips from the bottom nut, tighten it slightly with pliers. If the leak continues, drain the tank and check the rubber washer. Make sure it isn’t twisted or pinched, and replace it if damaged.
Prevent Future Toilet Pump Failures
Replace the Flapper at the Same Time
Flappers degrade alongside fill valves. Replacing both with a combo kit prevents phantom flushes and extends the life of your repair. It’s a small extra step that saves future headaches.
Clean the Valve Annually
Mineral deposits can clog the valve over time. Once a year, shut off the water and briefly turn the supply back on while the tank is empty. This flushes out sediment and keeps the valve working smoothly.
Monitor Your Home’s Water Pressure
High water pressure above 80 psi can damage fill valves prematurely. If you experience repeated failures, consider installing a pressure-reducing valve on your main water line to protect all your plumbing fixtures.
Frequently Asked Questions About How to Replace a Toilet Pump
What is a toilet pump, and where is it located?
A toilet pump is the common name for the fill valve, a vertical tube mounted inside the toilet tank. It controls water flow into the tank after each flush and shuts off when the water reaches the correct level.
How long does it take to replace a toilet pump?
Most homeowners complete the job in about 15 minutes. The process involves draining the tank, swapping the valve, and testing for leaks. No advanced plumbing skills are required.
Can I use a universal toilet pump on any toilet?
Universal fill valves fit most standard toilets, but always check clearance with the flush lever and flapper chain. Vintage or specialty models may require a specific replacement part for proper fit.
Why does my toilet still hiss after replacing the pump?
Persistent hissing usually means the float is set too high. Water is flowing into the overflow tube continuously. Lower the float according to the manufacturer’s instructions until the noise stops.
Do I need to replace the flapper when changing the toilet pump?
Replacing the flapper at the same time is highly recommended. Flappers wear out at a similar rate, and a worn flapper can cause phantom flushes that undermine your new valve’s performance.
What tools do I need to replace a toilet pump?
You only need a bucket, adjustable pliers, and a towel. No specialty plumbing tools are required. Most connections hand-tighten, though pliers help with stubborn or corroded nuts.
Key Takeaways for a Successful Toilet Pump Replacement
Replacing a toilet pump is one of the most cost-effective home repairs you can tackle. With a universal kit and basic tools, you can restore quiet, efficient flushing in under 15 minutes and stop wasting water immediately. Always set the valve height correctly before installation, and take a few extra minutes to replace the flapper at the same time. Test thoroughly for leaks and listen for hissing before considering the job done. Your next step is simple: grab a combo kit from your local hardware store and follow this guide to fix your running toilet today.