
Installing a bidet is one of the easiest and most impactful bathroom upgrades you can make. Whether you’re choosing a simple cold-water attachment or a high-tech electric seat, the installation process is straightforward and typically takes under 30 minutes. This guide walks you through every step so you can enjoy improved hygiene, reduce toilet paper use, and enhance bathroom comfort without hiring a plumber.
You’ll learn how to safely disconnect your toilet’s water supply, install the bidet securely, prevent leaks, and test operation correctly. We’ll also cover model-specific differences, common mistakes to avoid, and maintenance tips to keep your bidet working flawlessly for years.
Shut Off Water Supply Before Starting
Before touching any plumbing, stop water flow to avoid spills and flooding. This step is essential for a clean, safe installation process.
Locate the Shut-Off Valve
Find the small valve near the base of your toilet, usually on the wall or floor. Turn it clockwise until tight to cut off water to the tank.
Drain Remaining Water
Flush the toilet and hold the lever down to empty the tank. Disconnect the supply line from the bottom of the tank using an adjustable wrench. Let any leftover water drain into a small bucket placed underneath.
Keep a towel nearby to wipe up drips and protect flooring during this process.
Remove Your Existing Toilet Seat
Access to the mounting area requires removing the existing seat. This creates the foundation for attaching your bidet securely.
Pop Open the Seat Caps
Use a flathead screwdriver to gently pry off the plastic caps on the rear hinge bolts, located on the topside of the seat.
Loosen Bolts and Nuts
Use a wrench or pliers to loosen the nuts securing the bolts underneath. If they’re corroded, apply a drop of lubricant and wait a few minutes before trying again.
Lift the Seat Off
Once both nuts are removed, lift the seat and hinges off the bowl. Set them aside in case you reuse them later.
Clean the mounting area with a disinfectant wipe. A clean surface ensures a secure bidet fit.
Mount the Bidet Unit Properly

Proper alignment is critical for stability and function. Take your time with this step to ensure correct installation.
Attach Adjustment Plates
Slide the included metal or plastic adjustment plates onto the bidet base. These allow fit on both round and elongated bowls.
Position on Toilet Bowl
Place the bidet onto the bowl, aligning the plates with the original mounting holes. Adjust side-to-side until the screw holes line up perfectly.
Secure the Base
Press down firmly on the bidet base. Some models click into place when correctly seated. Do not fully tighten yet. Wait until after reattaching the toilet seat to finalize the connection.
Reinstall the Toilet Seat Over the Bidet
The original seat goes back on top of the bidet, creating a seamless look and functional setup.
Align the Hinges
Place the seat hinges over the bidet’s mounting posts. Insert the saved bolts through the hinge holes.
Tighten Evenly
Hand-start both nuts, then use a wrench to tighten gradually, alternating sides. This prevents warping or uneven pressure on the bidet base.
A slight gap when not sitting is normal. Your body weight compresses the gap during use, ensuring stability.
Install the T-Valve on the Fill Valve

This fitting splits water flow to both the toilet tank and the bidet, creating a dual-purpose water supply.
Prepare the T-Valve
Insert the rubber gasket into the T-valve inlet, the end that screws onto the fill valve. Wrap 4-5 layers of thread seal tape clockwise around the male threads.
Warning: Too little tape causes leaks. Too much can interfere with threading. Stick to exactly 4-5 wraps for the best seal.
Screw On the T-Valve
Attach the T-valve to the fill valve where the supply line was removed. Hand-tighten first, then give a quarter turn with an adjustable wrench to secure.
Orient for Hose Access
Point the side outlet toward the front of the toilet so the long hose reaches the bidet without kinking or bending sharply.
Connect Both Water Hoses
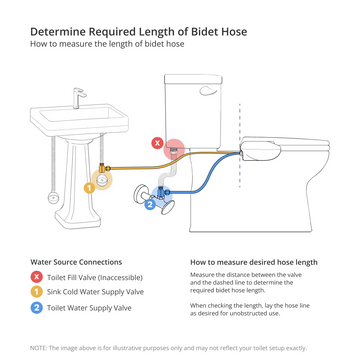
Two hoses complete the plumbing. One runs to the shutoff valve, and the other reaches the bidet itself.
Attach the Short Hose
Connect the short hose from the T-valve top inlet to the shut-off valve. Ensure the rubber washer is seated inside the fitting. Hand-tighten only to avoid damaging the seal.
Connect the Long Hose
Link the long hose from the T-valve side outlet to the bidet’s water inlet. Again, hand-tighten. Overtightening can crack plastic fittings.
Leave slack in the hose so the toilet seat can lift freely without straining the connection.
Restore Water and Check for Leaks
Now bring the system live and verify everything is sealed properly before testing the bidet function.
Turn Water Back On
Slowly open the shutoff valve. Let the tank refill completely before flushing or testing the bidet.
Inspect All Connections
Check for drips at the T-valve threads, hose connections, and fill valve base. Place a dry paper towel under each connection point to detect slow leaks.
If leaking occurs, turn the water off, reapply thread seal tape to the threads, and retighten gently. Most leaks come from insufficient tape or uneven tightening, and both are fixable in minutes.
Test Bidet Operation Correctly
Verify everything works before daily use. Proper testing ensures your bidet performs as expected.
For Non-Electric Models
Press the spray button or lever. You should feel a steady stream of water. Adjust water pressure using the side dial until spray feels effective but gentle.
For Electric Models
Plug into a GFCI-protected outlet. Test all functions including rear wash, front wash, dryer, and seat heat. Each feature should activate without issues.
Critical safety rule: Always test the spray while seated. Standing tests can cause uncontrolled spraying due to lack of nozzle obstruction. This protects you and your bathroom.
Solve Common Installation Problems

Quick fixes for frequent issues that arise during or after installation.
No Water Flow
Causes include kinked hose, closed valve, or clogged filter. Straighten the hose, confirm the valve is fully open, and remove and rinse the inlet filter if present.
Weak Spray
Low pressure or mineral buildup often causes weak spray. Increase the pressure setting on the side dial. Soak the nozzle in white vinegar for 10 minutes to dissolve mineral deposits.
Wobbly Seat
Loose mounting bolts cause wobbling. Tighten evenly, alternating sides. Do not over-torque, as this can crack plastic components.
Leaking at T-Valve
Poor seal is the primary cause. Turn off water, reapply 4-5 wraps of Teflon tape, and retighten the connection.
Electric Seat Won’t Power On
Tripped GFCI or dead outlet are the usual suspects. Reset the GFCI outlet, test with another device, and check your circuit breaker if needed.
Maintain Your Bidet Long-Term
Keep performance optimal with routine care. Regular maintenance extends the life of your bidet and ensures consistent function.
Monthly Tasks
Wipe down the exterior with mild cleaner. Pour half a cup of white vinegar into the inlet to flush mineral deposits from the water line.
Every 3-6 Months
Inspect hoses for cracks or brittleness. Replace rubber washers if wear is visible. Clean the nozzle manually if the self-cleaning function seems inadequate.
Most non-electric models offer 1-year coverage. Electric seats often have 2-5 years of protection. Register your product to activate the warranty.
Pick the Right Bidet Type for Your Needs
Match your needs with the correct model. Understanding the differences helps you choose wisely.
Non-Electric Bidet Attachments
Best for budget users, renters, and quick installation. These models require no power, offer easy setup, and cost $40-$150. The trade-off is cold water only with no dryer function.
Electric Bidet Seats
Best for homeowners seeking luxury features. These seats provide heated water, warm air dryer, and remote control functionality. Expect to pay $300-$1,000 or more. You’ll need a GFCI-protected outlet nearby.
Recommendation: Start with a non-electric model to experience the benefits before upgrading to a heated seat.
Stay Safe During Installation
Avoid hazards during and after installation by following these essential safety practices.
Plumbing Safety
Always shut off water first before starting any work. Use thread seal tape on all threaded joints. Never overtighten plastic fittings, as they can crack and leak.
Electrical Safety for Electric Models
Plug only into grounded, GFCI-protected outlets. Avoid extension cords entirely. Ensure the outlet is outside the splash zone, as required by NEC code.
Warning: Using a non-GFCI outlet with an electric bidet creates shock risk. Do not bypass electrical safety under any circumstances.
Adjust Spray Settings for Maximum Comfort
Get the most comfort from your bidet by fine-tuning these settings.
Set Water Pressure Correctly
Start at the lowest setting. Gradually increase until spray feels effective but gentle. Everyone’s preference differs, so adjust to your comfort level.
Position the Nozzle
Some models let you move the nozzle forward or backward for personalized coverage. Experiment to find your ideal position.
Use Front and Rear Wash Properly
Rear wash is for post-defecation cleaning. Front wash is for feminine hygiene or general freshening. Both functions clean effectively when used as intended.
Let the nozzle self-clean after each use. Most models do this automatically.
Reduce Your Environmental Impact
A bidet reduces environmental impact and long-term costs simultaneously.
Cut Toilet Paper Use by 75%
Even partial bidet use significantly lowers consumption. Pair with reusable wipes for greater savings and sustainability.
Save Money Over Time
At 50 cents per roll average, reducing use by 5 rolls weekly saves approximately $130 per year. The savings add up quickly.
Improve Hygiene Significantly
Water cleansing removes residue better than wiping alone. This reduces skin irritation and decreases infection risk for many users.
Bidets are standard in Japan, South Korea, and much of Europe. Adoption in the US has accelerated since 2020.
Final Installation Checklist
Ensure every step is complete before declaring success.
Water shut off. Tank drained. Old seat removed. Bidet aligned and seated. Toilet seat reinstalled and tightened. T-valve installed with seal tape. Both hoses connected correctly. Water restored with no leaks. Spray tested while seated. Electrical outlet confirmed for electric models.
Congratulations. You’ve completed a high-impact, low-cost home upgrade that boosts comfort, cleanliness, and sustainability.
Frequently Asked Questions About Installing a Bidet
How long does it take to install a bidet?
Most installations take 15-30 minutes for non-electric models. Electric seats may take slightly longer due to electrical setup. Experience level and your specific toilet model affect timing.
Do I need a plumber to install a bidet?
No. Bidet installation is beginner-friendly and requires only basic tools. The process uses simple connections that most homeowners can handle without professional help.
Will a bidet fit my toilet?
Most bidet attachments fit standard round and elongated toilets. Check your toilet bowl shape before purchasing. Adjustment plates included with most models accommodate both sizes.
What if my toilet doesn’t have a shut-off valve?
Older toilets may lack a dedicated shut-off valve. In this case, you may need to install one or shut off the main water supply to your home temporarily.
Can I use a bidet with a septic system?
Yes. Bidets work well with septic systems. In fact, using water for cleansing reduces the solid waste that enters your septic tank, potentially extending its life.
Key Takeaways for Installing Your Bidet
Installing a bidet is a beginner-friendly project that pays off immediately in hygiene and convenience. With just basic tools and attention to sealing threads and proper alignment, you can finish in under 30 minutes.
Whether you choose a $40 cold-water model or a $600 smart seat, the core installation steps remain consistent. The T-valve connection, hose routing, and mounting process apply to all bidet types.
Start with a simple non-electric model to experience the benefits. Maintain regularly by cleaning the nozzle and checking connections periodically. Enjoy a cleaner, greener bathroom routine for years to come.