
Is your bidet not spraying, leaking, or completely unresponsive? You are not alone. Many electronic bidet seats stop working due to simple issues like dead remote batteries or sensor malfunctions, not permanent damage. The good news: most problems can be fixed at home without replacing the entire unit. Whether your bidet will not turn on, leaks water, or fails to detect you sitting down, this guide walks you through proven troubleshooting steps and repairs. You will learn how to diagnose electrical faults, fix common leaks without new parts, and restore full functionality, saving time and money.
Bidet Not Responding? Check These First
Even if your bidet has power, unresponsive controls often stem from overlooked but easy-to-fix causes. Start here before disassembling anything.
Replace Remote Control Batteries
Dead or weak batteries are the number one reason for non-responsive remotes, even when the seat appears powered.
- Remove the battery cover on the remote
- Install fresh alkaline batteries (do not reuse old ones)
- Test all buttons immediately after replacement
Pro Tip: Some models use the remote to trigger self-tests. If nothing happens after battery swap, proceed to reset the system.
Reset the Bidet System
Software glitches can freeze internal electronics. A reset often restores function.
- Unplug the bidet power adapter from the wall
- Wait 10 to 15 seconds to fully discharge capacitors
- Plug back in and power on
- Test remote and auto-activation by sitting down
This clears temporary faults caused by power surges or firmware hiccups.
Re-Pair the Remote
Some bidets require remote synchronization after battery changes or power outages.
- Refer to your manual for pairing mode (often involves holding two buttons)
- Ensure no metal objects or electronics block the signal path
- Test proximity by holding the remote close to the seat during initial sync
Why Your Bidet Will Not Activate When Sitting
No beep, no spray, and no heat, even with power? The issue is likely the seat sensor, not the entire unit.
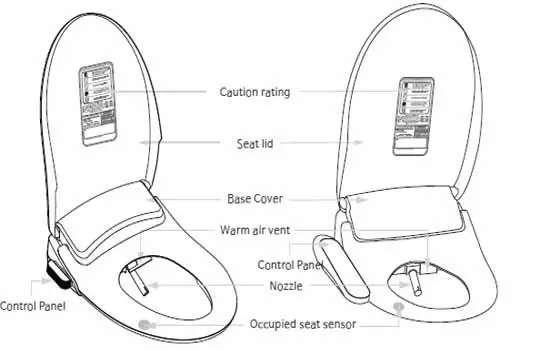
Clean the Capacitive Sensor Area
Bidets use capacitive sensors in the seat rim to detect body contact. Moisture, grime, or residue can block detection.
- Wipe the top edge of the seat with a dry or slightly damp cloth
- Avoid cleaners with alcohol or abrasives
- Dry thoroughly before testing
Warning: Never use wet wipes or sprays directly on the seat electronics.
Test for Occupancy Detection
Listen for a soft beep when you sit. No sound means the sensor is not registering.
- Sit fully and make sure thighs and buttocks contact the seat
- Avoid testing with clothing between you and the seat
- If still no response, the sensor may be damaged internally
Bypass the Sensor for Diagnosis
Some models allow manual override via remote functions. For example, the Spray button may work even if auto-detect fails.
- If manual spray works, the sensor is faulty, not the motor or water supply
- If nothing works, the issue may be deeper, involving the circuit board or wiring
Fix a Leaking Bidet Hose Without Replacement

A dripping connection under the toilet is common, and often repairable without buying new parts.
Shut Off Water and Disconnect Hose
Safety first:
- Turn the water shut-off valve clockwise to close
- Use a spanner to loosen the hose nut at the valve end
- Let residual water drain into a towel or pan
You do not need to disconnect from the bidet side unless access is poor.
Remove the Metal Sleeve
The outer metal sleeve compresses the hose during installation.
- Use a utility knife to cut a small gap between the sleeve and plastic lock
- Insert a flathead screwdriver and gently pry the sleeve off
Now you can access the internal plastic lock and hose.
Inspect the Plastic Lock for Cracks
This small white collar is a frequent failure point.
- Look for cracks, warping, or splitting
- If broken, try super glue (cyanoacrylate)
- Clean surfaces first, align pieces perfectly, and clamp for 12 to 24 hours
Alternatively, order a replacement lock from the manufacturer.
Trim a Burst Inner Hose
If the rubber hose inside is leaking:
- Cut out the damaged section with scissors or a cutter
- Remove no more than 1 to 2 inches (ensure enough length remains)
- Slide the metal shield and plastic lock back over the hose
- screw the lock clockwise onto the metal shield to secure both ends
This protects the shortened hose from further wear.
Reconnect the Hose Properly
Reassembly is critical to prevent re-leaking.
- Slide the metal sleeve over the hose first (this step is often missed)
- Insert hose fully into the flange nipple until it stops
- Push the plastic lock forward to clamp it tight
- Use pliers to gently squeeze the hose end if insertion is hard
Key Step: Do not skip the rubber washer.
Check the Rubber Washer: It Is Critical
A tiny rubber ring creates the watertight seal. If missing or cracked, leaks are inevitable.
- Locate the washer inside the hose connector
- Ensure it is seated flat, not twisted or pinched
- Replace if hardened, split, or deformed
Pro Tip: Keep spare washers on hand. They cost pennies but prevent big messes.
Reattach and Test for Leaks
Final steps to confirm success:
- Reconnect hose to the shut-off valve using the spanner
- Tighten snugly but do not over-tighten (can crack plastic)
- Slowly open the water valve
- Watch both ends for drips or seepage
Test spray function:
- Use the remote to activate wash
- A steady, strong spray with no leaks means the repair worked
If it still leaks: Recheck washer placement and hose seating.
When to Replace vs. Repair a Bidet
Not every issue can be DIY-fixed. Know when to call it quits.
Replace If:
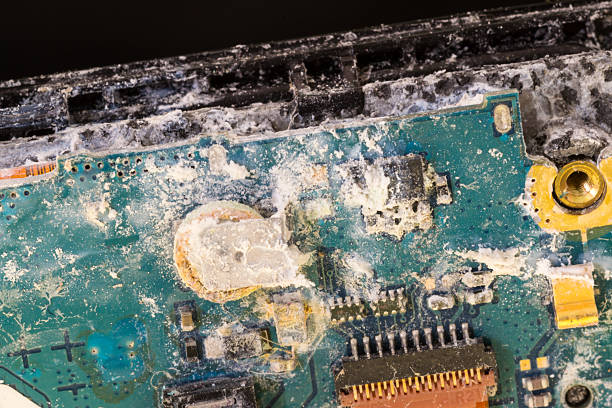
- Circuit board shows corrosion or burn marks
- Water has entered the main control unit
- Multiple leaks persist after repairs
- Model is discontinued and parts are unavailable
- Repair costs exceed 50% of a new unit
Repair If:
- Only remote, hose, or sensor is affected
- Unit is under warranty (except for user-damaged parts)
- You have confirmed simple fixes first (batteries, reset, cleaning)
Prevent Future Bidet Problems
Avoid repeat failures with simple maintenance.
Monthly Checks
- Inspect hose for swelling, kinks, or dampness
- Clean seat sensor with a dry microfiber cloth
- Run nozzle self-clean cycle (if available)
Annual Upgrades
- Replace remote batteries every 12 months (do not wait for failure)
- Replace rubber washers and plastic locks proactively
Usage Tips
- Never yank the hose (store it gently in its holder)
- Avoid harsh bathroom cleaners near electronics
- Unplug during long absences or storms
Tools and Supplies You Will Need
Keep these on hand for quick fixes.
| Tool or Item | Use |
|---|---|
| Spanner (adjustable wrench) | Tighten hose connections |
| Flathead screwdriver | Remove metal sleeve |
| Utility knife | Cut sleeve, trim hose |
| Scissors | Trim damaged hose |
| Pliers | Assist hose insertion |
| Super glue (cyanoacrylate) | Repair cracked plastic lock |
| Fresh AA or AAA batteries | Restore remote function |
| Spare rubber washers | Prevent leaks |
Pro Tip: Order manufacturer-specific parts when possible for best fit.
Common Bidet Failures and Fast Fixes
| Symptom | Likely Cause | Fix |
|---|---|---|
| No response when sitting | Dirty or failed sensor | Clean seat edge, test for beep |
| Remote does not work | Dead batteries | Replace with fresh ones |
| Dripping hose connection | Worn washer or loose lock | Replace washer, reseat hose |
| Spray is weak or uneven | Clogged nozzle | Run self-clean cycle |
| Bidet beeps but will not spray | Water valve closed or kinked hose | Open valve, check hose path |
| Unit powers but no heat | Heating element fault | Contact manufacturer support |
Final Safety and Repair Tips
Always turn off water and unplug before any repair. Never open the main control box, as this voids the warranty and risks shock. If in doubt, contact the manufacturer. Many companies offer free diagnostics over the phone. For older units, consider upgrading to a modern bidet with better seals and diagnostics.
Fixing a bidet does not require a plumber or electrician in most cases. With the right steps, you can restore full function in under an hour and avoid the cost of replacement. Start with batteries, reset, and sensor cleaning. Then move to hose repairs if leaking. Most problems are mechanical, not electronic. Stay safe, work dry, and fix it right the first time.
Frequently Asked Questions About Fixing a Bidet
How do I know if my bidet sensor is broken?
If your bidet does not beep or activate when you sit down, and manual remote controls also fail, the capacitive sensor likely needs attention. Clean the seat edge first. If the problem persists, the sensor may be faulty and require professional repair or replacement.
Can I fix a leaking bidet hose without buying new parts?
Yes. Many leaks stem from a cracked plastic lock or worn rubber washer. Both can be repaired with super glue or replaced cheaply. If the inner hose is damaged, you can trim the affected section and reassemble using the existing metal shield and lock.
Why does my bidet remote suddenly stop working?
The most common cause is dead or weak batteries. Even if batteries appear charged, they may lack sufficient power for the remote signal. Replace with fresh alkaline batteries and test immediately.
How often should I replace bidet remote batteries?
Replace remote batteries annually as a preventive measure. Do not wait for failure, as a dead remote makes the entire bidet appear broken even when the unit itself is fine.
Is it worth repairing an old bidet?
If the repair involves simple parts like the remote, hose, or sensor, repair is usually worth it. However, if the circuit board is corroded, multiple leaks persist, or the model is discontinued with unavailable parts, replacement makes more financial sense.
Can I fix a bidet that will not heat water?
If the unit powers on but produces no heat, the heating element may be faulty. This typically requires professional repair or replacement of the bidet seat, as the heating component is internal and not user-serviceable.