
You are not alone if you have ever wondered how to convert a toilet to a bidet. Millions of people made the switch during the 2020 toilet paper shortage, and many stayed for the hygiene, comfort, and eco-friendly benefits. The good news is that you do not need to replace your entire toilet or call a plumber. With the right tools and a clear plan, you can upgrade your bathroom in under an hour.
Converting your toilet into a bidet-equipped system is a simple, cost-effective improvement that enhances personal cleanliness, reduces toilet paper use, and adds luxury to your daily routine. This guide walks you through every option, from budget-friendly sprayers to high-end electric seats, so you can choose the best method for your bathroom, budget, and lifestyle.
Choose Your Bidet Conversion Type
Selecting the right bidet conversion method depends on your plumbing setup, budget, and desired features. Each option offers different benefits, from basic functionality to spa-like comfort.
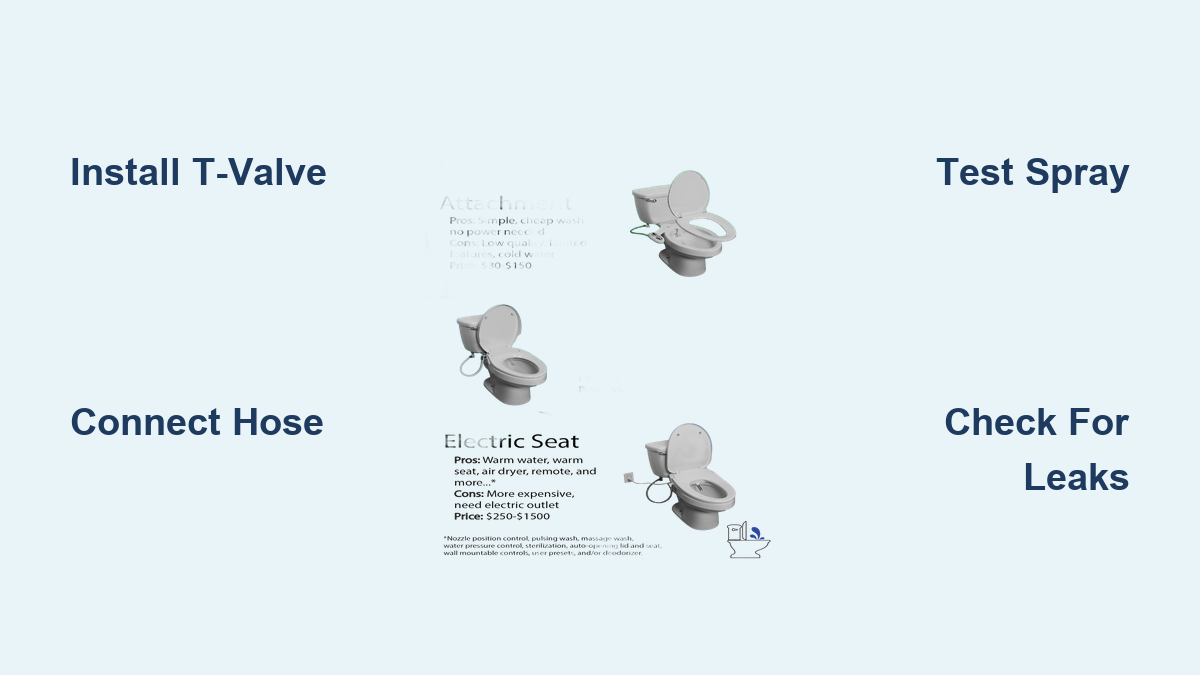
Handheld Bidet Sprayer Kit
This option is ideal for renters and DIYers on a budget. The system adds a trigger-controlled spray wand mounted beside the toilet, connecting to the toilet water supply via a T-valve. No electricity is required, and installation takes under 30 minutes. The cost ranges from $39 to $60, and you control the spray manually for highly flexible, precise cleaning.
Non-Electric Bidet Seat
This mechanical seat replaces your existing toilet seat and delivers cold water spray through adjustable front and rear nozzles. It uses your toilet water line and a side dial for pressure control. Priced from $80 to $150, it is perfect for users who want an integrated look without electrical wiring. It works well in cold climates where warm water is not essential.
Electric Bidet Seat
This is the premium choice, offering heated water, warm air drying, adjustable pressure, and remote control. These seats plug into a GFCI outlet and connect to the toilet water supply. Prices range from $200 to over $1,000. This option is best for elderly users, those with mobility issues, or anyone wanting a spa-like experience. Installation takes 30 to 60 minutes.
Sink-Tap Bidet System
Use this method when your toilet lacks accessible plumbing, which is common in apartments with flushometer or tankless toilets. This approach taps into the bathroom sink hot and cold water lines using a dual-outlet valve. A long hose runs discreetly to the bidet seat or sprayer. It requires access to sink plumbing but avoids major modifications.
Side-Mounted Wall Bidet
This is a fixed-position spray wand mounted on the wall or toilet sidewall. It connects to sink water lines and offers warm or cold water. Priced between $130 and $150, it is ideal for compact bathrooms and design-focused spaces. It operates like a handheld sprayer but stays in place.
Gather Tools and Materials
Before starting your bidet conversion, gather the necessary tools and plumbing components. Being prepared ensures a smoother installation process.
Essential Tools for Installation
You will need several basic tools to complete the installation. An adjustable wrench or channel-lock pliers tightens T-valves and hose fittings. A screwdriver, Phillips or flathead, removes toilet seat bolts and covers. Keep a small bucket nearby to catch residual water during disconnection. Stock up on Teflon tape to seal threaded joints, using four to five wraps. Have towels and disinfectant wipes ready to clean the area and absorb spills.
Pro Tip: Use a flashlight if space behind the toilet is tight.
Plumbing Parts You Will Need
The plumbing components required depend on your installation method. For toilet-supply systems, you need a T-valve measuring 3/8 inch by 3/8 inch by 3/8 inch to split water flow between tank and bidet. A braided stainless steel hose provides flexible, kink-resistant connection. You also need a rubber washer with a raised lip that faces the tank to ensure a proper seal. A male adapter plug seals any unused T-valve port, costing approximately $6.50. Plumber tape prevents leaks on threaded connections.
For sink-supply systems, you need a dual outlet valve to split sink water to sink and bidet. An extended braided hose up to 72 inches runs from sink to toilet. If you have a commercial flush valve, you need a flushometer adapter such as the Brondell T22.
Warning: Never use plastic hoses because they can burst under pressure.
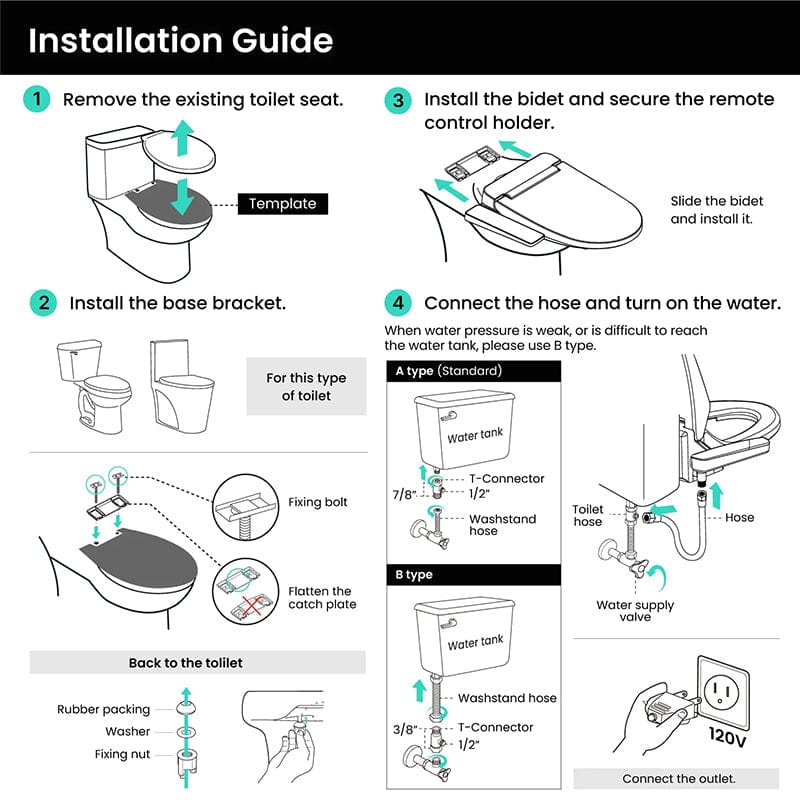
Install a Bidet Seat Using Toilet Water Supply
This section covers the standard installation method for most residential toilets with gravity-flush systems.
Shut Off Water and Drain the Tank
Locate the shut-off valve behind the toilet near the floor. Turn it clockwise to close. Flush the toilet and hold the lever down to empty the tank completely. Disconnect the water supply line and drain any remaining water into a bucket. Place a towel underneath to catch drips.
Remove the Old Toilet Seat
Lift the plastic hinge caps to expose the mounting screws. Use a screwdriver to loosen the top screws and remove the nuts underneath. Carefully lift off the seat. Clean the mounting area with disinfectant to ensure a secure fit for the new bidet seat.
Install the T-Valve
Insert the rubber washer into the T-valve inlet with the raised lip facing the tank. Screw the T-valve onto the toilet fill valve outlet, which is typically 7/8 inch to 1 inch. Hand-tighten first, then use a wrench to secure, but do not over-tighten. Position the side outlet to face forward, toward the user.
Connect the Bidet Hose
Attach one end of the braided stainless steel hose to the T-valve open port. Connect the other end to the bidet seat water inlet. Apply four to five wraps of Teflon tape to all threaded joints before tightening. Hand-tighten fittings and avoid kinking the hose.
Mount the Bidet Seat
Align the bidet mounting plate with the toilet hinge holes. Insert barrel nuts, rubber cone washers, and flat washers through the bowl from below. Secure with adjustable brackets or screws. Slide the seat onto the mounting plate until it clicks into place.
Restore Water and Test
Slowly open the shut-off valve. Check all connections, including the T-valve, hose, and tank inlet, for leaks. Wait five minutes and recheck. Activate bidet functions to test front and rear wash, adjust pressure via dial or remote, and confirm the nozzle retracts and self-cleans properly.
Time: 20 to 45 minutes
Difficulty: Easy to moderate
Use Sink Water Supply for Flushometer Toilets
This method works for apartments and commercial buildings where toilet plumbing is inaccessible or incompatible with standard T-valves.
Shut Off Sink Water
Turn off the shutoff valve under the sink. If there is no individual shutoff, temporarily shut off the main water supply. This prevents flooding during installation.
Install the Dual Outlet Valve
Unscrew the sink supply hose from the faucet. Install a dual-outlet valve with 3/8 inch compression by dual outlets. Reconnect the sink supply to one outlet. This ensures both sink and bidet receive water.
Run Hose to the Toilet
Connect a flexible braided hose, up to 72 inches, to the second outlet. Route it along the baseboard or behind the wall, avoiding tripping hazards. Keep the path free of sharp bends or kinks.
Connect to the Bidet
Attach the hose to the bidet water inlet. Seal any unused T-valve port with a 1/2 inch threaded male adapter plug. Apply Teflon tape to all threads before tightening.
Power and Test for Electric Models
Plug the bidet into a GFCI-protected outlet within three to six feet. Turn on the sink water valve. Check for leaks at every joint. Test all functions, including spray, pressure, and drying if applicable.
Time: 30 to 60 minutes
Difficulty: Moderate to advanced
Note: This method bypasses the toilet plumbing entirely, making it ideal for apartments and commercial toilets.
Install a Handheld Bidet Sprayer Kit
This is the quickest and most affordable conversion method, perfect for renters or those wanting a simple solution.
Install T-Valve and Hose
Follow the same steps as the bidet seat installation. Shut off water, install the T-valve with the rubber washer lip toward the tank, and connect the braided hose to the horizontal outlet.
Attach Sprayer and Holder
Connect the sprayer by hand without using tools. Ensure the internal rubber gasket seals properly. Mount the holder on the outside of the toilet base using the included nuts and bolts. Position it for easy reach.
Test the System
Open the water valve slowly. Check for leaks. Squeeze the trigger to activate spray. Adjust the angle manually for targeted cleaning.
Result: Fully functional handheld bidet in under 30 minutes, costing $39 to $60.
Compare Bidet Features and Models

Understanding the different features helps you choose the right bidet for your needs.
Top Bidet Attachments
Several models stand out in the market. The SimpleSpa Thinline offers dual nozzles and side-arm control at $69.99. The FreshSpa Thinline Advanced provides warm and cool water with sink connection at $49.99. The Modra Button Bidet features front and rear buttons with self-cleaning. The SouthSpa Series includes left-handed models with ceramic core, ranging from $59.99 to $89.99. The Side-Mounted Attachable Bidet offers wall-mounted installation with dual temperature at $129.99 to $149.99.
Nozzle and Control Options
Single nozzles alternate front and rear wash, which is simpler but less hygienic. Dual nozzles provide separate nozzles for feminine and posterior cleaning. Side-arm dials work well for users with arthritis or limited dexterity. Remote controls, found on electric models, adjust temperature, pressure, and drying settings.
Water Temperature Options
Cold-only options use the standard toilet supply. Ambient temperature provides comfortable water in moderate climates. Warm or cool water requires connection to the sink hot water line.
Pro Tip: Self-cleaning nozzles flush before and after use, found in models like SimpleSpa Thinline and Modra Button Bidet.
Check Compatibility Before You Buy
Verifying compatibility prevents installation headaches and returns.
Toilet and Plumbing Requirements
Your toilet shape matters. Bidets work with both round and elongated bowls, but verify with the manufacturer template. The tank outlet size is typically 7/8 inch to 1 inch threaded connection. Water pressure must be at least 20 to 30 psi for proper spray. Mounting holes must align with the toilet hinge holes, though adjustable brackets help accommodate variation. The rough-in distance is standard at 12 inches from wall to flange center.
For electric models, you need a 120V GFCI outlet within three to six feet. Ensure at least six inches of clearance behind the toilet for hose and control box placement.
Warning: Low-profile toilets may not have space for a T-valve. Measure first.
Understand Performance and Value
Different bidet types offer varying features and price points.
| Feature | Handheld Sprayer | Non-Electric Seat | Electric Seat |
|---|---|---|---|
| Water Source | Cold only | Cold only | Heated |
| Pressure Control | Manual trigger | Dial (3 to 7 levels) | Remote |
| Spray Pattern | Single jet | Front and rear | Oscillating and pulsating |
| Heated Seat | No | No | Yes |
| Warm Air Dryer | No | No | Yes |
| Installation Time | Under 30 minutes | 20 to 45 minutes | 30 to 60 minutes |
| Cost | $39 to $60 | $80 to $150 | $200 to $1,000 plus |
Quote: “The combination bidet-toilet offers a hygienic, comfortable experience with minimal installation effort.” — Professional installer
Troubleshoot Common Problems
Knowing how to fix common issues ensures your bidet works reliably.
Leaking at T-Valve
A loose connection or missing washer causes leaks. Reapply Teflon tape and ensure the rubber washer has the raised lip facing the tank.
No Water Flow
A kinked hose, closed valve, or clogged filter restricts flow. Inspect the hose path, confirm the valve is open, and clean the inlet filter with vinegar.
Seat Misalignment
The mounting plate may not be centered. Loosen the bolts, reposition the seat, and retighten.
Hard-to-Reach Bolts
Some toilets only offer top-side access. Use a top-mount kit or long-reach tools to solve this problem.
Electrical Issues
No nearby outlet prevents electric bidet operation. Install a GFCI outlet or use a UL-rated extension cord.
Incompatible Threads
Some brands like Toto use proprietary fittings. Use manufacturer-specific adapters to resolve this.
Maintain Your Bidet for Long Life
Regular maintenance extends the life of your bidet and ensures consistent performance.
Weekly Maintenance
Clean the nozzle using a soft brush or cloth, or activate the self-cleaning mode. Wipe down the seat with mild soap and water, avoiding harsh chemicals.
Annual Care
Descale the T-valve and hose if you have hard water by soaking in vinegar solution. Inspect gaskets and replace them if cracked or leaking.
Expected Lifespan
Handheld sprayers typically last five to seven years. Non-electric seats last five to eight years. Electric seats last seven to ten years, depending on electronic component longevity.
Warranty Tip: Register your product online for one to three year coverage and recall alerts.
Stay Safe and Hygienic
Following safety and hygiene practices protects you and maximizes bidet benefits.
Safety First
Always shut off water before starting installation. Use a GFCI outlet for electric models to prevent shock. Never over-tighten plastic or brass fittings. Avoid chemical cleaners in water lines.
Hygiene Benefits
Bidets reduce toilet paper use by up to 80 percent. They are ideal for hemorrhoid sufferers, postpartum recovery, mobility-limited users, and people with IBS or sensitive skin.
First-Time Use Tips
Start with low pressure and room-temperature water. Adjust the nozzle position slowly. Let skin air-dry or use minimal paper. Practice while seated to learn the controls.
Final Tips for a Successful Conversion
Converting your toilet to a bidet is one of the smartest bathroom upgrades you can make. It is affordable, eco-friendly, and improves daily comfort. Whether you choose a $40 sprayer or a $600 heated seat, the process is DIY-friendly and takes less than an hour.
Key Takeaways:
- Use toilet water supply for standard gravity-flush toilets
- Tap into sink plumbing for flushometer or tankless models
- Choose sink-connected models for warm water
- Always check toilet shape, water pressure, and electrical access before purchasing
- Prioritize GFCI outlets for electric bidets
With quality parts and careful installation, your bidet will deliver years of reliable, hygienic use without requiring a plumber.
Frequently Asked Questions About Converting a Toilet to a Bidet
Can I install a bidet on any toilet?
Most standard toilets accept bidet attachments. You need to verify your toilet shape (round or elongated), check that you have at least six inches of clearance behind the toilet, and ensure water pressure meets the minimum 20 to 30 psi requirement. Low-profile toilets may not have space for a T-valve.
Do I need electricity for a bidet conversion?
No, you do not need electricity for handheld sprayers or non-electric bidet seats. These use your existing toilet water supply. Electric bidet seats require a nearby GFCI-protected outlet within three to six feet of the toilet.
How long does installation take?
Handheld sprayer kits install in under 30 minutes. Non-electric bidet seats take 20 to 45 minutes. Electric bidet seats require 30 to 60 minutes. Sink-tap methods for flushometer toilets take 30 to 60 minutes depending on complexity.
Will a bidet work in an apartment with a flushometer toilet?
Standard T-valve connections do not work with flushometer toilets. However, you can use the sink-tap method, which connects to the bathroom sink water lines instead. This bypasses the toilet plumbing entirely.
How much does a bidet conversion cost?
Handheld sprayer kits cost $39 to $60. Non-electric bidet seats range from $80 to $150. Electric bidet seats cost $200 to over $1,000. Sink-tap systems and side-mounted bidets fall between $130 and $150.
Can I get warm water from my bidet?
Non-electric seats provide cold water only. To get warm water, connect your bidet to the sink hot water line using models like FreshSpa Thinline Advanced, or choose an electric bidet seat with built-in heating.