
Installing a Bio Bidet transforms your bathroom into a modern, hygienic space with minimal effort. Whether you’re upgrading to a non-electric bidet attachment like the SlimEdge or installing a smart electric seat such as the BB-550 or BB-2000, the process is designed for DIY success in 20 to 45 minutes. This guide covers every step from shutting off water to testing spray functions using only the tools and parts included or commonly found at home.
You’ll avoid the most common mistakes like over-tightening or skipping Teflon tape and ensure a leak-free, fully functional installation on your first try. We’ll walk through model-specific differences, highlight what to watch for, and share pro tips from thousands of real user experiences.
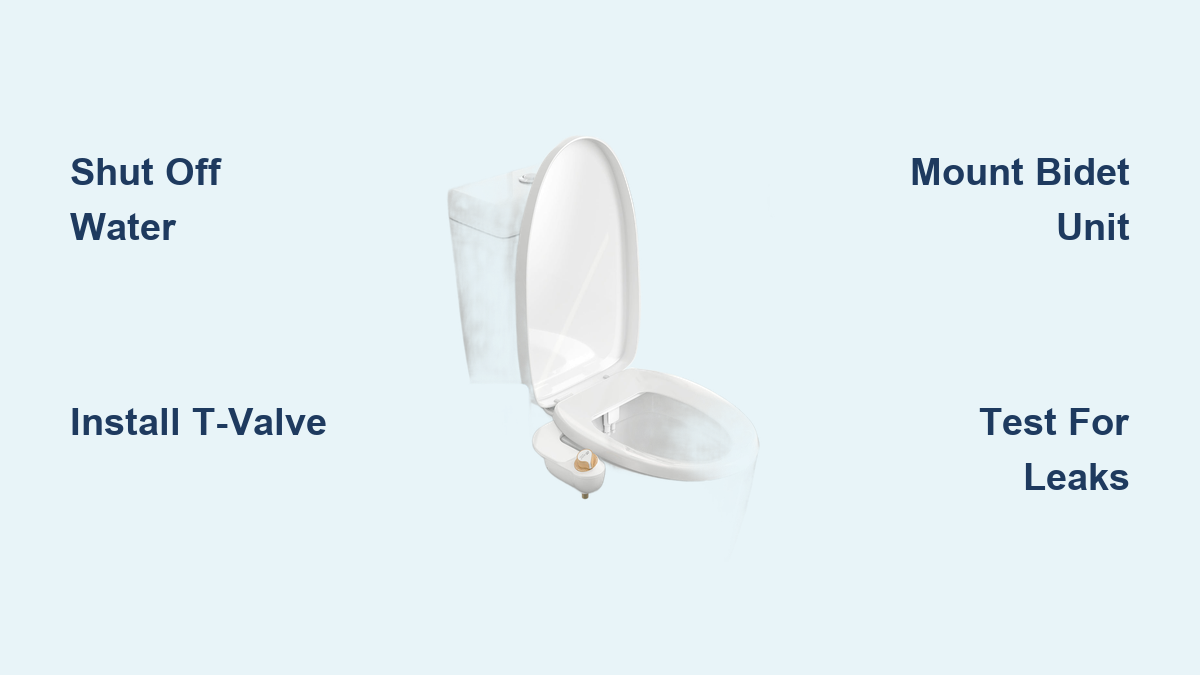
Prepare Toilet and Shut Off Water
Before touching any hardware, stop water flow to prevent spills and flooding. This step is crucial for a clean, stress-free installation.
Turn Off Water Supply
Locate the shut-off valve behind or beside the toilet’s base. Rotate the handle clockwise until tight. Flush the toilet to empty the tank completely and hold the lever down to drain residual water. Confirm no refill occurs to verify the valve is closed.
Place a towel or small bowl under the tank’s inlet to catch drips when disconnecting hoses.
Remove Existing Toilet Seat
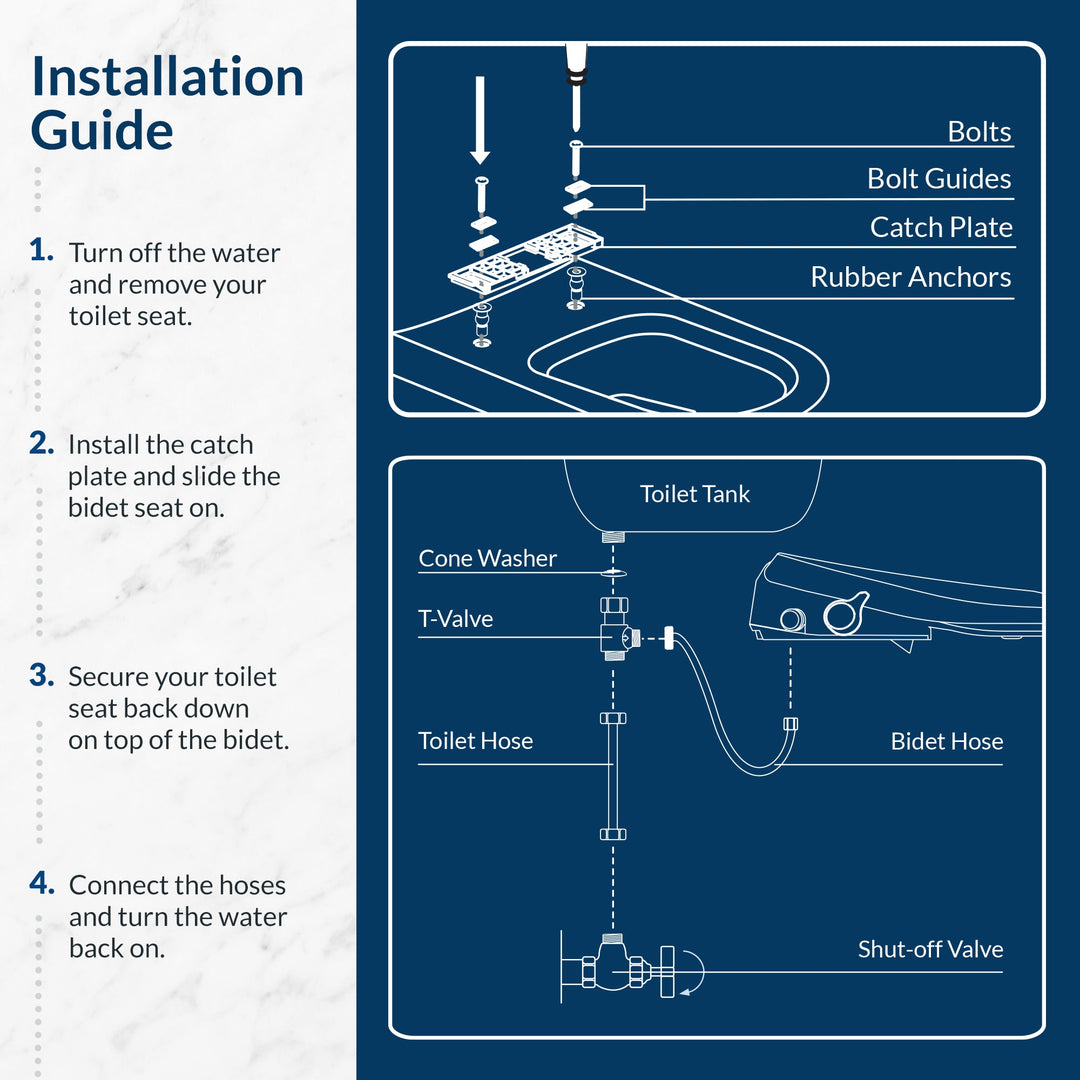
Flip up the seat and locate plastic caps at the back near the hinges. Pop them open with a flathead screwdriver or fingernail. Use a Phillips screwdriver to loosen the mounting bolts while holding the wing nut underneath to prevent it from spinning. Lift off the old seat and clean the mounting area with disinfectant wipes.
Don’t discard the original seat if installing a bidet attachment like the SlimEdge because you’ll reuse it.
Install the T-Valve Water Splitter
The T-valve splits water flow: one line to refill the tank and one to power the bidet. This is where most leaks occur if done incorrectly.
Connect T-Valve to Tank
Use an adjustable wrench to disconnect the supply hose from the bottom of the tank. Insert the rubber gasket into the T-valve with the smaller side facing up for SlimEdge models. For BB-2000 and newer, follow the manual since gasket orientation may differ.
Screw the T-valve onto the tank’s outlet with the side port positioned outward toward the toilet’s side for hose access. Reattach the original tank supply line to the bottom port of the T-valve. Connect the bidet supply hose to the side outlet.
Seal Threads with Teflon Tape
Wrap 2 to 3 layers of Teflon tape clockwise around exposed male threads. Apply to both the T-valve and bidet hose connections if plastic-to-metal. This ensures a leak-proof seal without over-tightening.
Some models like the BB-2000 install the T-connector at the tank’s bottom rather than a side inlet. Always check your model’s manual.
Mount the Bidet Unit
The mounting process differs significantly between non-electric attachments and electric seats. Choose the section that matches your model.
Install Bidet Attachments (SlimEdge, Slim Twist)
These attach under your existing seat and do not replace it. This maintains your original seat height and comfort.
Insert mounting discs into the bidet’s screw holes and rotate them to match your toilet’s bolt spacing. Press silicone non-slip pads into the grooves on the back. Position the bidet against the bowl aligned with the discs. Reinstall the original seat and lid over the bidet. Reinsert screws and tighten evenly while holding wing nuts underneath. Snap caps back on.
The SlimEdge keeps your seat height unchanged, which is ideal for maintaining comfort.
Mount Electric Bidet Seats (BB-500, BB-550, BB-2000)
These replace your toilet seat and offer heated seats, self-cleaning nozzles, and remote controls. The installation is more involved but straightforward.
Slide metal washers onto bolts with ridges facing up. Place rubber washers on the bowl side with thin edge up and wide edge down. Insert bolts through the bowl rim and leave them loose for adjustment. Align the mounting plate tab to face backward to prevent forward slide.
Remove blue protective tape from the seat’s underside. Slide the bidet onto the plate aligning side grooves. Press the release button and slide forward until it clicks. If front overhangs, loosen the plate, shift seat back, then retighten.
The BB-550 includes a plastic alignment template. Use it before final tightening.
Connect Water Supply Hose
Now link the bidet to the T-valve. This is the final water connection before testing.
Attach Bidet Hose
Connect the braided stainless steel hose from the bidet inlet to the T-valve’s side outlet. Ensure rubber washers are inside both ends. Hand-tighten only. Do not use a wrench because overtightening cracks plastic fittings or deforms washers.
Route Hose Neatly
Use the 90-degree elbow adapter if included to run the hose vertically along the tank. This prevents kinks and improves aesthetics.
Never force connections. If it doesn’t thread smoothly, check for cross-threading or incorrect gaskets.
Plug In Electrical Connection (Electric Models)

This section applies to BB-500, BB-550, BB-2000, Discovery DLS, and similar electric models.
Use a GFCI Outlet
Plug the bidet into a grounded 3-prong GFCI outlet. GFCI prevents electrocution in wet environments. Do not use extension cords or power strips.
Non-GFCI outlets violate electrical safety standards and void warranties.
Set Up Remote Control
Insert 2 AA batteries into the remote. Mount it on the wall using screws or adhesive. Place in a dry, reachable spot. Never place it inside the shower zone.
BB-550 uses a standard plug, making replacements easier than older models.
Activate Sensors and Test Functions
Electric bidets require sensor activation before use. Skip this step and the bidet won’t respond.
Enable Seat Sensor
Peel off the protective film on the front underside of the seat. This activates the weight and hand sensors.
Test Activation Methods
Wave your hand over the front for hand sensor testing. The red light should turn on. For seat sensor testing, sit down with bare skin contact because clothing may block detection.
Run Wash Cycle
Press the wash button on the remote or side panel. Nozzles extend, self-clean, then spray. Release your hand or stand up to stop.
If spray doesn’t start, check for kinked hoses, closed valves, or unpeeled sensor film.
Final Leak Test and System Check
This is the moment of truth. Take your time and verify everything works before finishing.
Restore Water Supply
Slowly open the shut-off valve counter-clockwise. Let the tank refill completely. Inspect all connections including the T-valve, supply hose ends, and mounting bolts.
Fix Leaks Immediately
If dripping occurs, turn off water and recheck gasket placement. Add Teflon tape if needed. Hand-tighten connections and replace damaged washers.
Verify Full Operation
Confirm the tank refills normally. Check that the bidet sprays with correct pressure and aim. Verify heated seat warms in 1 to 2 minutes. Test that dryer activates when seated if equipped. Confirm remote responds and nozzles self-clean before and after use.
Run a full cycle with toilet paper in the bowl to check spray reach and avoid splashing.
Troubleshoot Common Installation Issues
Even careful installations can have hiccups. Here’s how to fix the most frequent problems.
Fix Leaking T-Valve
The cause is usually a missing gasket, wrong orientation, or no Teflon tape. Reinstall the gasket with the small side up for SlimEdge. Wrap threads with Teflon tape. Hand-tighten only.
Bidet Won’t Spray
Check the following: Is the water valve open? Is the hose kinked? Is the sensor film removed? Is power on for electric models?
Weak Water Pressure
Clean the nozzle filter by unscrewing the cap under the bidet. Rinse the filter under tap water and reinstall. Ensure the T-valve isn’t installed backward because the side port must feed the bidet.
Seat Won’t Lock
Reposition the mounting plate by loosening bolts and sliding the seat back. Press the release button and re-engage. Confirm the tab is facing rear.
Sensor Not Responding
Remove the protective sticker. Clean the sensor with a dry cloth. Test with bare skin contact, avoiding underwear or robes.
Dryer Not Working
Verify weight detection by sitting fully on the seat. Check the control panel to confirm the dryer isn’t set to off. Ensure power is connected and the GFCI hasn’t tripped.
Model-Specific Tips and Features
Different Bio Bidet models have unique installation requirements and features. Here’s what you need to know.
SlimEdge Bidet Attachment
This model costs $35 and has a 4.4-star rating from over 17,000 reviews. It requires no seat replacement and provides powerful spray starting at 80 percent pressure with a slight knob turn. Use Teflon tape because users report leaks without it.
BB-500 vs BB-550
BB-500 lacks a warm air dryer while BB-550 includes it. Both use side panel controls and cost around $200. BB-550 is the smarter buy since you get the dryer for the same price.
BB-2000 / Bliss BB-2000
This full-featured electric seat includes a remote control, heated seat, adjustable spray, air dryer, deodorizer, and night light. Self-cleaning nozzles sanitize before and after each use.
Discovery DLS
This premium model features auto-open/close lid and dual nozzles for front and rear washing. It requires extra space behind the toilet and works best with elongated bowls.
Discovery DLX (All-in-One Toilet)
This replaces your entire toilet and includes auto-flush, UV sterilization, and unlimited warm water. Professional installation is required. Do not attempt DIY installation on this model.
Final Installation Checklist
Before finishing, verify each of these items.
Water shut off and tank drained. Old seat removed and area cleaned. T-valve installed with correct gasket. Supply hoses connected with washers. Bidet securely mounted and locked. Electrical plug in GFCI outlet if electric. Remote installed and powered. Water restored and leak-tested. Sensor film removed. Wash and dry functions tested. User trained on controls and aiming.
Frequently Asked Questions About Installing a Bio Bidet
How long does it take to install a Bio Bidet?
Most users complete the installation in 20 to 45 minutes. Non-electric attachments like the SlimEdge typically take 20 to 30 minutes. Electric seats like the BB-550 or BB-2000 require 30 to 45 minutes due to additional mounting and electrical steps.
Do I need a plumber to install a Bio Bidet?
No, Bio Bidet installations are designed for DIY success. No specialized plumbing or electrical tools are required. All necessary hardware is included with the bidet. Simply follow the step-by-step instructions and use hand-tightening to avoid over-torquing connections.
What tools are required to install a Bio Bidet?
You need a Phillips screwdriver, a small adjustable wrench, Teflon tape, a towel to catch drips, and disinfectant wipes for cleaning. A flathead screwdriver is optional for prying open screw caps. No specialized tools are required.
Can I install a Bio Bidet on any toilet?
Bio Bidets fit most standard round and elongated toilets. Check the model-specific compatibility before purchasing. Some models like the Discovery DLS require more clearance behind the toilet due to motorized components.
Why is my Bio Bidet leaking after installation?
Leaks typically occur from missing or incorrectly oriented gaskets, missing Teflon tape on threaded connections, or over-tightening which cracks plastic fittings. Turn off water immediately, recheck gasket placement, add Teflon tape, and hand-tighten all connections.
Key Takeaways for Installing Your Bio Bidet
Installing a Bio Bidet is a straightforward DIY project that takes 20 to 45 minutes with the right preparation. The most critical steps are properly shutting off water, correctly installing the T-valve with the gasket in the right orientation, and hand-tightening all connections to avoid leaks. Non-electric attachments like the SlimEdge preserve your existing seat, while electric models like the BB-550 and BB-2000 replace the seat entirely and require GFCI electrical protection.
Test all functions before finishing and address any leaks immediately. Bio Bidet offers free support at (847) 458-2334 or support@biobidet.com if you encounter issues. With proper installation, your Bio Bidet will deliver years of comfort, improved hygiene, and reduced toilet paper use.